
 Deutsch
 Francais
 Nederlands


Glue glass cabochons
In this DIY tutorial, we show them how to glue glass cabochons onto motif sheets and into settings.
Wonderful pieces of jewelry can be conjured up with glass cabochons, motif bows and settings. To make it really beautiful and special, there are a few things to consider. What is the right glue, etc.?
With glass cabochon, motif bows and settings you can make great jewelry.
It is particularly important to choose the right adhesive for each step of the process.
Motif bows
Motif sheets are often used for glass cabochon jewelry. The sheets can be printed by yourself or bought as printed sheets (offset printing). For gluing you can use dispersion glue and/or Glossy Accents glue.
Offset printing:
Problem-free processing with Glossy glue and dispersion glue possible.
Laser printer:
usually problem-free processing with Glossy adhesive and dispersion adhesive possible.
Inkjet printer:
Colors smudge during gluing when printed on plain paper. Glossy photo paper is better suited. Here, too, colors may smudge due to adhesive!
Adhesive
This is important
Color fastness test
We always recommend that you first glue a motif with the adhesive as a test. If no color change has occurred after approx. 1 hour, you can continue working.
Do not shake the Glossy adhesive before use.
Otherwise, air bubbles will form in the adhesive, which will be visible as unsightly stains on the finished piece of jewelry.
Dosag
e
Pay attention to the correct dosage:
too little = areas without adhesive appear stained
too much glue = paper may curl during drying, glue will swell out from under the cabochon
Air bubbles
If an air bubble has formed under the cabochon, try to remove the bubble immediately by pressing firmly on the cabochon. Air bubbles remain visible as small spots in the dried cabochon.
Straight surface for drying
Use a smooth and waterproof base to work on. A soft base is not suitable. Uneven surfaces will cause the cabochon to dry unevenly and may result in stains.
Motif sheets are often used for glass cabochon jewelry. The sheets can be printed by yourself or bought as printed sheets (offset printing). For gluing you can use dispersion glue and/or Glossy Accents glue.
Offset printing:
Problem-free processing with Glossy glue and dispersion glue possible.
Laser printer:
usually problem-free processing with Glossy adhesive and dispersion adhesive possible.
Inkjet printer:
Colors smudge during gluing when printed on plain paper. Glossy photo paper is better suited. Here, too, colors may smudge due to adhesive!
Adhesive
- Dispersion adhesive
- Glossy Accents adhesive
This is important
Color fastness test
We always recommend that you first glue a motif with the adhesive as a test. If no color change has occurred after approx. 1 hour, you can continue working.
Do not shake the Glossy adhesive before use.
Otherwise, air bubbles will form in the adhesive, which will be visible as unsightly stains on the finished piece of jewelry.
Dosag
e
Pay attention to the correct dosage:
too little = areas without adhesive appear stained
too much glue = paper may curl during drying, glue will swell out from under the cabochon
Air bubbles
If an air bubble has formed under the cabochon, try to remove the bubble immediately by pressing firmly on the cabochon. Air bubbles remain visible as small spots in the dried cabochon.
Straight surface for drying
Use a smooth and waterproof base to work on. A soft base is not suitable. Uneven surfaces will cause the cabochon to dry unevenly and may result in stains.

Adhere motif. Place a drop of Glossy Accents glue on the flat side of the clean and lint-free cabochon. Spread the glue slightly on the cabochon with the tip of the glue bottle.
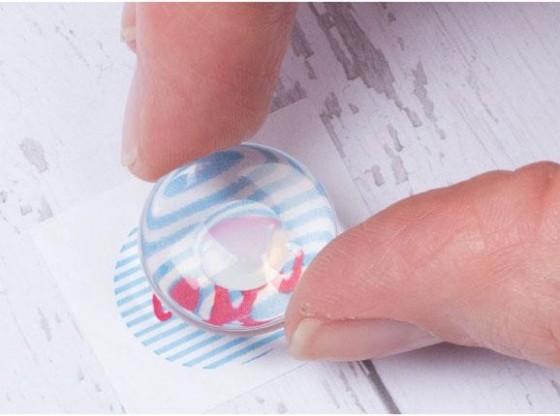
Place the cabochon on the motif sheet with the adhesive on the bottom of the cabochon.

Press the cabochon firmly onto the motif.
Adhesive
Glossy or dispersion adhesive?
Both adhesives are suitable for gluing the glass cabochon to the motif.
The Glossy adhesive
has the advantage that it is immediately transparent. This makes it easier to check whether the motif is centered correctly.
Dispersion adhesive
becomes transparent only after drying.
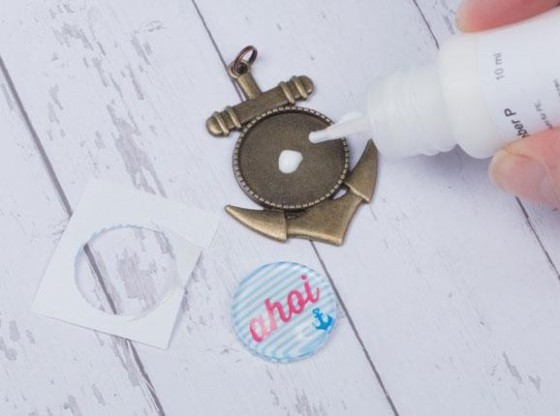
Glue the glass cabochon into the setting.
Allow the motif to dry completely.
Cut out the motif around the glass cabochon. Use the dispersion adhesive to glue it into the setting.
Put some glue in the setting and spread the glue in the setting. Place the cabochon in the setting and press it down. Allow the glued setting to dry thoroughly for 24 hours.
This is important:
Glue edges
should you have used a little too much glue to stick the motif, the glue has dried as a border around the cabochon. Carefully cut out the motif sheet. The dry glue can become brittle and led to small spots on the edge of the cabochon.
Dispersion glue
use dispersion glue for gluing into the setting. Superglue or jewelry glue may attack the printed design from the back side and stains may appear on the cabochon. Glossy glue does not have enough adhesive strength to hold the cabochon permanently in the setting. Sometimes the glossy glue reacts with bronze colored settings and small spots can form under the cabochon.